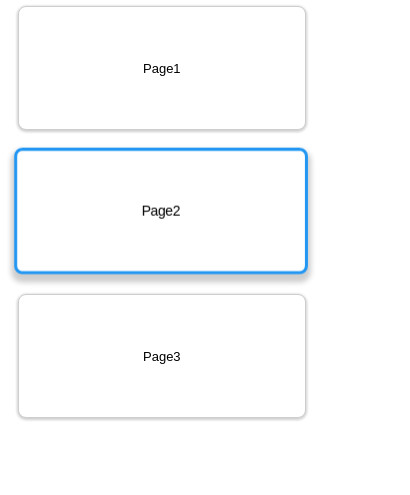
AngularのAnimate2
はじめに
前回の続きです。
公式ドキュメントのボタンのように、マウスオーバーした時にボタンが浮き上がって見える、という動きを真似してみます。
マウスオーバーとマウスが離れた時のイベントを取得する
まずはマウスカーソルをボタン上に移動させた場合(マウスオーバー)と、ボタン外に移動させた場合(マウスアウト)とでイベントを取得します。
gui-anime.component.html
< button [@positionState]='state' (mouseover)="onButtonIn()" (mouseout)="onButtonOut()">
タイトル
< /button>
gui-anime.component.ts
〜省略〜
export class GuiAnimeComponent implements OnInit {
  private state: string;
  constructor() { }
  ngOnInit() {
  }
  private onButtonIn(){
    this.state = 'active';
  }
  private onButtonOut(){
    this.state = 'inactive';
  }
}
CSS
影や位置のしていなど、アニメーションで切り替えたい要素以外の装飾については、angular-cliで「ng g component 〜」実行時にhtmlやtsなどと同時に生成されるcssに書くことにします。
gui-anime.component.css
.positionanime{
    background-color: #fff;
    border-radius: 8px;
    width:20vw;
    height: 10vh;
    position: relative;
    -webkit-border-radius: 8px;
    -moz-border-radius: 8px;
    margin: 10px;
}
ボタンの背景色、角丸設定などを行っています。
アニメーション
それでは、アニメーション部分にとりかかります。
今回主に実装するのは下記の動きです。
- 枠の太さ、色を非アクティブ・アクティブな時で切り替える
- ボタンが非アクティブなときは小さめの影を、アクティブなときは大きめの影を表示する
- ボタンを主にZ方向に移動させる
枠
枠の色や太さを指定します。
gui-anime.component.ts
import { Component,
  Input,
  trigger,
  state,
  style,
  transition,
  animate,
  AnimationPlayer,
  OnInit } from '@angular/core';

@Component({
  selector: 'app-gui-anime',
  templateUrl: './gui-anime.component.html',
  styleUrls: ['./gui-anime.component.css'],
  animations: [
    trigger('positionState', [
      state('active', style({
        border: '3px solid #2196F3',
        boxShadow: '0px 5px 6px 3px #CECECE',
        transform: 'translate3d(-1px, -1px, 50px) scale(1.02)',
        zIndex: 30
      })),
      state('inactive',   style({
        border: '1px solid #CECECE',
        boxShadow: '0px 1px 3px 1px #CECECE',
        transform: 'translate3d(0px, 0px, 0px) scale(1)',
        zIndex: 10
      })),
      transition('active => inactive', animate('200ms ease-in-out')),
      transition('inactive => active', animate('200ms ease-in-out'))
    ])
  ]
})
〜省略〜
- 枠の太さの指定方法として、px指定の他にも「thin」や「medium」などを使うこともできます。
が、今回のようにアニメーションさせる場合は一瞬枠が指定より太くなるなどの問題が発生するため、pxなどで指定しておいた方が良さそうです。
影
影は「boxShadow」で指定します。
gui-anime.component.ts
〜省略〜
  animations: [
    trigger('positionState', [
      state('active', style({
        border: '3px solid #2196F3',
        boxShadow: '0px 5px 6px 3px #CECECE',
        transform: 'translate3d(-1px, -1px, 50px) scale(1.02)',
        zIndex: 30
      })),
      state('inactive',   style({
        border: '1px solid #CECECE',
        boxShadow: '0px 1px 3px 1px #CECECE',
        transform: 'translate3d(0px, 0px, 0px) scale(1)',
        zIndex: 10
      })),
      transition('active => inactive', animate('200ms ease-in-out')),
      transition('inactive => active', animate('200ms ease-in-out'))
    ])
  ]
})
〜省略〜
- 指定する値は 1:影のX座標値 2:Y座標値 3:ブラー(値が大きいほど広くぼんやりした影になる) 4:影の大きさ 5:影の色 です。
移動
アニメーションで要素を移動させたい場合、「translate」を使用します。 X、Y、Zの特定方向のみに移動させるときは「translateX」「translateY」「translateZ」、すべてを移動させる場合は「translate3d」を使います。
gui-anime.component.ts
〜省略〜
  animations: [
    trigger('positionState', [
      state('active', style({
        border: '3px solid #2196F3',
        boxShadow: '0px 5px 6px 3px #CECECE',
        transform: 'translate3d(-1px, -1px, 50px) scale(1.02)',
        zIndex: 30
      })),
      state('inactive',   style({
        border: '1px solid #CECECE',
        boxShadow: '0px 1px 3px 1px #CECECE',
        transform: 'translate3d(0px, 0px, 0px) scale(1)',
        zIndex: 10
      })),
      transition('active => inactive', animate('200ms ease-in-out')),
      transition('inactive => active', animate('200ms ease-in-out'))
    ])
  ]
})
〜省略〜
- 上記では位置の指定をpxでしていますが、X、Yについては%を使って指定することもできます。
- translateとscaleなど、「transform」に複数の要素を指定したい場合、上記のようにそれぞれをスペース区切りで指定します。
Z-Index
今回は必要ないのですが、例えばボタン同士がひっついていて、マウスオーバー中のボタンを前に出したい、という時に、うまく該当のボタンが前に出てくれない場合があります。
そのような場合、「z-index」を使い、マウスオーバー時の値をそれ以外より大きく設定することで解決できます
(※CSSで「position: relative;」などの指定をする必要があります)。
gui-anime.component.ts
〜省略〜
  animations: [
    trigger('positionState', [
      state('active', style({
        border: '3px solid #2196F3',
        boxShadow: '0px 5px 6px 3px #CECECE',
        transform: 'translate3d(-1px, -1px, 50px) scale(1.02)',
        zIndex: 30
      })),
      state('inactive',   style({
        border: '1px solid #CECECE',
        boxShadow: '0px 1px 3px 1px #CECECE',
        transform: 'translate3d(0px, 0px, 0px) scale(1)',
        zIndex: 10
      })),
      transition('active => inactive', animate('200ms ease-in-out')),
      transition('inactive => active', animate('200ms ease-in-out'))
    ])
  ]
})
〜省略〜
ngFor
さて、このボタンを1つだけではなく複数並べてみたいと思います。
ただし、全く同じ動作をするものをコピペでは作りたくない。。。
ということで、interfaceを作ってボタン表示に必要な要素を持つ配列を作り、「ngFor」を使って並べてみることにします。
interface
「ng g interface AnimeButton」をTerminalで実行して、interfaceを作成します。
anime-buton.ts
export interface AnimeButton {
    id: number;
    pageTitle: string;
    discription: string;
    state: string;
}
で、Componentでこのinterfaceの配列を作ります。
gui-anime.component.ts
export class GuiPositionanimeComponent implements OnInit {

  private animeButtons: AnimeButton[] = [
    {id: 0, pageTitle: 'Page1', discription: 'Page No.1', state: 'inactive'},
    {id: 1, pageTitle: 'Page2', discription: 'Page No.2', state: 'inactive'},
    {id: 2, pageTitle: 'Page3', discription: 'Page No.3', state: 'inactive'},
  ];

  constructor() { }
  ngOnInit() {
  }

  private onButtonIn(targetId: number){
    this.animeButtons[targetId].state = "active";
  }
  private onButtonOut(targetId: number){
    this.animeButtons[targetId].state = "inactive";
  }
}
これをHTMLにセットします。
gui-anime.component.html
< section class='animeButtons'>
  < div *ngFor="let aButton of animeButtons">
    < button class='positionanime' [@positionState]=aButton.state (mouseover)="onButtonIn(aButton.id)" (mouseout)="onButtonOut(aButton.id)">
    {{aButton.pageTitle}}
    < /button>
  < /div>
< /section>
- まず親となるタグで「class=‘animeButtons'」(「animeButtons」はComponentで定義した変数名)を指定し、
「*ngFor=“let aButton of animeButtons"」でC#のForeach文のように値を取り出しています。
これで比較的シンプルに複数ボタンが表示できます。

疑問点
ngForから値を取り出す部分で、「{{aButton.pageTitle}}」のように値を取り出すサンプルは見つかったのですが、 「[@positionState]=aButton.state」の「aButton.state」部分のような書き方は見つけられませんでした。
とりあえず動作はしているのですが、これで正しいのかが不安なところです。
これについては正誤が判断つき次第追記します。
参考
- Animations - ts - GUIDE - Angular
- ng2-hands-on-seed/courses/tutorial at master - ng-japan/ng2-hands-on-seed - GitHub
- 〜なんだかいけそうな気がする〜Angular入門 - Speaker Deck
- Angular 2 Cookbook