Angular 10 + NgRx + Nest.js でプロジェクトを作る
はじめに
今回はサーバー側のプログラムも追加してみます。
今回は TypeScript 好きである、ということもあって Nest.js を選びました。
Environments
- Angular ver.10.0.2
- @ngrx/store ver.9.2.0
- @ngrx/effects ver.9.2.0
- @nestjs/ng-universal ver.2.0.1
Angular ver.10のプロジェクトに @ngrx/store が追加できない
前回同様「npx ng add @ngrx/store」で NgRx を追加しようとするとエラーが発生。
Installing packages for tooling via npm.
Installed packages for tooling via npm.
The package that you are trying to add does not support schematics. You can try using a different version of the package or contact the package author to add ng-add support.
下記の Issue によると、「@latest」をつける必要があるとのこと。
npx ng add @ngrx/store@latest
「@latest」をつけない場合、 1.2.0 のような古いバージョンのものがインストールされているようでした。
cannot use ng add to install ngrx store · Issue #2604 · ngrx/platform · GitHub
「@ngrx/effects」については「@latest」が必要かどうかはわかりませんでしたが、とりあえずつけてインストールしました。
npx ng add @ngrx/effects@latest
Nest.js のプロジェクトを追加する
「@nestjs/ng-universal」を使って Nest.js のプロジェクトを追加します。
GitHub - nestjs/ng-universal: Angular Universal module for Nest framework (node.js) 🌷
元々は Server-Side Rendering のためのものではありますが。
「ng add」コマンドを実行すると、プロジェクト名を聞かれるので先に作成した Angular のプロジェクト名を入力します。
npx ng add @nestjs/ng-universal
プロジェクトを実行する(失敗)
「npm run serve」で実行し、「localhost:4200」にアクセスするわけですが、ここでエラーが発生しました。
...
[Nest] 12736   - 07/08/2020, 1:04:45 AM   [ExceptionsHandler] Cannot read property 'indexOf' of undefined +28479ms
TypeError: Cannot read property 'indexOf' of undefined
...
下記の Issue によると、「liveReload」を false にする必要があるとのこと。
TypeError: Cannot read property 'indexOf' of undefined · Issue #188 · nestjs/ng-universal · GitHub
server/app.module.ts
import { Module } from '@nestjs/common';
import { AngularUniversalModule } from '@nestjs/ng-universal';
import { join } from 'path';

@Module({
  imports: [
    AngularUniversalModule.forRoot({
      viewsPath: join(process.cwd(), 'dist/browser'),
      bundle: require('../server/main'),
      liveReload: false
    })
  ]
})
export class ApplicationModule {}
白いページが表示される
「liveReload」自体も気になるところですが、とにあれこれでエラーなしでページを表示できました。
が、そこにあるのはただ真っ白のページ。Angular のページではありません。
プロジェクトの README.md にある「bootstrap」は(恐らく)仕様変更のため「AngularUniversalOptions」に存在せず、サンプルコードをそのままコピペすることはできないようです。
ただ、「localhost:4200/index.html」にアクセスすると、正しく Angular のページが表示できました。

ということで、 デフォルトの Static file が設定されていないようだ、ということはわかりました。
またまた README.md を見ると「templatePath」というプロパティがあったため、追加してみたのですが動作しないようです。
server/app.module.ts
import { Module } from '@nestjs/common';
import { AngularUniversalModule } from '@nestjs/ng-universal';
import { join } from 'path';

@Module({
  imports: [
    AngularUniversalModule.forRoot({
      viewsPath: join(process.cwd(), 'dist/browser'),
      bundle: require('../server/main'),
      liveReload: false,
      templatePath: join(process.cwd(), 'dist/browser/index.html'),
    })
  ]
})
export class ApplicationModule {}
「@nestjs/serve-static」を使ったり、ルーティングで index.html を表示させる、といった処理が必要なのでしょうか。。。?
2020-07-08 追記
@nestjs/serve-static 追加
今回は Nest.js で静的ファイルを扱うことができるようにする「@nestjs/serve-static」を使って解決することにしました。
npm install --save @nestjs/serve-static
server/main.ts
import { NestFactory } from '@nestjs/core';
import { ApplicationModule } from './app.module';
import { NestExpressApplication } from '@nestjs/platform-express';
import { join } from 'path';

async function bootstrap() {
  const app = await NestFactory.create(ApplicationModule);
  app.setGlobalPrefix('api');
  app.useStaticAssets(join(__dirname, '..', 'browser'));
  await app.listen(4200);
}
bootstrap();
NgRx に触れてみる 1
はじめに
前から気になっていた NgRx に触れてみます。
NgRX は Redux のように状態を管理するためのものです。
今回は Redux のチュートリアルにある tic-tac-toe をなんとなく真似してみることにします。
環境
- Angular: 10.0.2
- @ngrx/store: 9.2.0
- @ngrx/effects: 9.2.0 (Effects で使用)
Install
npx ng add @ngrx/store
元のプロジェクト
まずは NgRx を使用しないプロジェクトを用意しますよ( Effects に関連するところは後で)。
app.component.html
<app-board></app-board>
board.component.html
<div class="board">
<app-square
    *ngFor="let s of state.squares; let i = index"
    [props]="s" (onClick)="updateSquare(i)"></app-square>
</div>
board.component.ts
import { Component, OnInit } from '@angular/core';
import { BoardState } from './board-state';

@Component({
  selector: 'app-board',
  templateUrl: './board.component.html',
  styleUrls: ['./board.component.css']
})
export class BoardComponent implements OnInit {
  public state: BoardState;
  constructor() {
    this.state = this.initialState();
  }

  ngOnInit(): void {
  }
  public updateSquare(index: number) {
    const squares = this.state.squares.slice();
    squares[index] = (this.state.nextIsX)? '✕': '◯';
    this.state = {
        nextIsX: ! this.state.nextIsX,
        squares
    };
  }
  private initialState(): BoardState {
    return {
        nextIsX: true,
        squares: Array(9).fill(null),
    };
  }
}
board.component.css
.board {
    display: flex;
    flex-direction: row;
    flex-wrap: wrap;
    height: auto;
    width: 21vw;
}
board-state.ts
import { SquareValue } from './square/square-value';

export type BoardState = {
    nextIsX: boolean,
    squares: Array<SquareValue>
};
square.component.html
<button class="square" (click)="click()">{{props}}</button>
square.component.ts
import { Component, OnInit, Input, Output, EventEmitter } from '@angular/core';
import { SquareValue } from './square-value';

@Component({
  selector: 'app-square',
  templateUrl: './square.component.html',
  styleUrls: ['./square.component.css']
})
export class SquareComponent implements OnInit {
  @Input() props: SquareValue;
  @Output() onClick: EventEmitter<void> = new EventEmitter();
  constructor() { }

  ngOnInit(): void {
  }
  public click() {
    this.onClick.emit();
  }
}
square.component.css
.square{
    height: 7vw;
    width: 7vw;
}
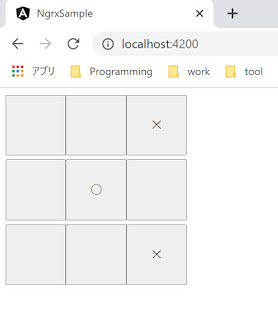
実行すると 9 個のボタンが表示され、クリックすると順に「◯」「✕」が表示されます。

Action, Reducer, Store を追加する
Action を作る
「何が起こったか」(今回はボタンがクリックされた) を表現する Action を作ります。
game.actions.ts
import { createAction, props } from '@ngrx/store';

export const updateSquare = createAction('[Game] updateSquare',
    props<{index: number}>());
Action を作る上で必須になるのは第一引数である「type」のみです。
ですが、今回はクリックされたボタンの配列番号が欲しかっったので「props」を第二引数として追加しています。
Reducer を作る
次は「Action によって状態がどう変わるか」(今回は「◯」または「✕」が入る)を表現する Reducer を追加します。
game.reducer.ts
import { createReducer, on, Action } from "@ngrx/store";
import { BoardState } from './board/board-state';
import { updateSquare } from './game.actions';

function initialState(): BoardState {
    return {
        nextIsX: true,
        squares: Array(9).fill(null),
    };
}
function getUpdatedState(lastState: BoardState, index: number): BoardState {
    const squares = lastState.squares.slice();
    squares[index] = (lastState.nextIsX)? '✕': '◯';
    return {
        nextIsX: ! lastState.nextIsX,
        squares
    };
}
const _gameReducer = createReducer(initialState(),
    on(updateSquare, (state, {index}) => getUpdatedState(state, index)));

export function reducer(state: BoardState | undefined, action: Action) {
    return _gameReducer(state, action);
}
今回は Action を一つだけ登録していますが、二つ以上の場合は下記のように追加していきます。
const _gameReducer = createReducer(initialState(),
    on(updateSquare, (state, {index}) => getUpdatedState(state, index)),
    on(resetSqure, (state) => initialState()));
StoreModule に Reducer を登録する
Reducer を有効にし、状態管理が行われるようにするため StoreModule に登録します。
app.module.ts
import { BrowserModule } from '@angular/platform-browser';
import { NgModule } from '@angular/core';

import { AppComponent } from './app.component';
import { StoreModule } from '@ngrx/store';
import { BoardComponent } from './tic-tac-toe/board/board.component';
import { SquareComponent } from './tic-tac-toe/board/square/square.component';
import * as gameReducer from './tic-tac-toe/game.reducer';
@NgModule({
  declarations: [
    AppComponent,
    BoardComponent,
    SquareComponent
  ],
  imports: [
    BrowserModule,
    StoreModule.forRoot({game: gameReducer.reducer})
  ],
  providers: [],
  bootstrap: [AppComponent]
})
export class AppModule { }
Component に接続する
「Board」 Component で今の状態の取得、 Action 、 Reducer を使って状態の更新をできるようにします。
board.component.ts
import { Component, OnInit } from '@angular/core';
import { BoardState } from './board-state';
import { Store, select } from '@ngrx/store';
import { Observable } from 'rxjs';
import { updateSquare } from '../game.actions';

@Component({
  selector: 'app-board',
  templateUrl: './board.component.html',
  styleUrls: ['./board.component.css']
})
export class BoardComponent implements OnInit {
  // receive current state
  public state$: Observable<BoardState>;

  constructor(private store: Store<{game: BoardState}>) {
    this.state$ = store.pipe(select('game'));
  }
  ngOnInit(): void {
  }
  public updateSquare(index: number) {
    // call the reducer to update the state
    this.store.dispatch(updateSquare({index}));
  }
}
ここで重要だと思うのは「select('game')」です。
引数の「game」は app.module.ts で登録したものと合わせる必要があります。
ここが違っているとエラーは発生しませんが状態を受け取ることができない、という問題が発生します(ちょっとハマりました)。
board.component.html
<div class="board">
<app-square
    *ngFor="let s of (state$|async)?.squares; let i = index"
    [props]="s" (onClick)="updateSquare(i)"></app-square>
</div>
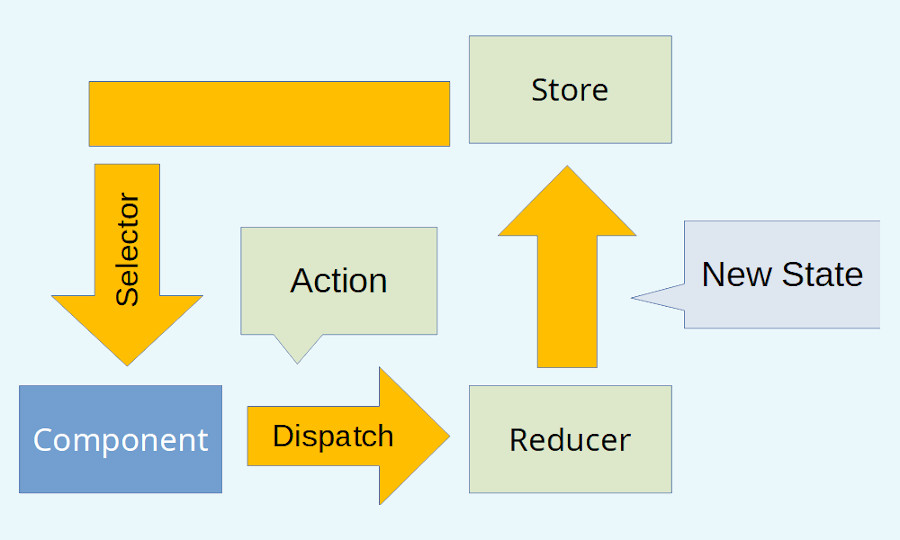
現状
ここまでで下記のような流れができています。

Effects を使う
次は Effects(@ngrx/effects) を使ってみます。
名前からすると「side-effects (副作用)」なのかな?と思いきや、ネットワークリクエストなど、外部リソースにアクセスする場合に使われるようです。
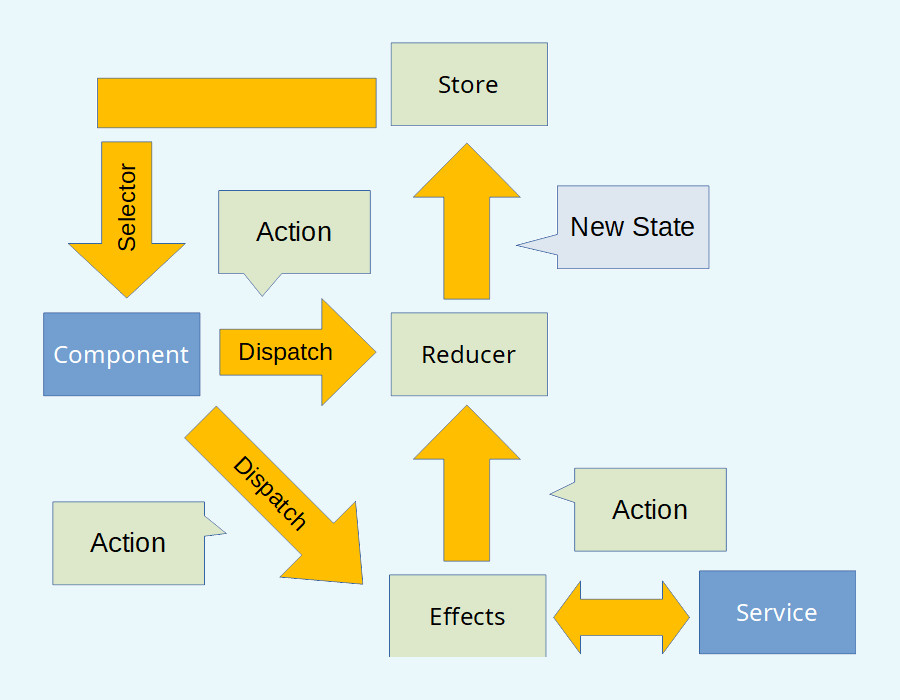
Reducer のように、「store.dispatch」を使って Action を発行することで処理を呼び出します。
流れとしてはこんな感じ。。。のはず。

Install
npx ng add @ngrx/effects
元のプロジェクトに Service を追加する
今回のサンプルでは、ボタンがクリックされ、状態が変化したタイミングでゲームの勝敗がついたかを確認する処理を追加します。
簡易化のためサーバーにアクセスなどはしてません。
check-game-finished.ts
import { SquareValue } from './board/square/square-value';
import { GameResult } from './game-result';

type CheckTarget = {
    index: number,
    match: readonly CheckTarget[],
    unmatch: readonly CheckTarget[]
};
const emptyTarget = {
    match: [],
    unmatch: []
};
const checkTargets: CheckTarget = {
    index: 0,
    match: [{
        index: 1,
        match: [{
            index:2,
            ...emptyTarget
        }],
        unmatch: []
    }, {
        index: 3,
        match: [{
            index: 6,
            ...emptyTarget
        }],
        unmatch: []
    }, {
        index: 4,
        match: [{
            index: 8,
            ...emptyTarget
        }],
        unmatch: []
    }],
    unmatch: [{
        index: 4,
        match: [{
            index: 1,
            match: [{
                index: 7,
                ...emptyTarget
            }, {
                index: 3,
                match: [{
                    index: 5,
                    ...emptyTarget
                }],
                unmatch: []
            }],
            unmatch: []
        }],
        unmatch:[{
            index: 8,
            match: [{
                index: 2,
                ...emptyTarget
            },{
                index: 6,
                ...emptyTarget
            }],
            unmatch: []
        }]
    }]
};
function getTargetIndices(squares: readonly SquareValue[]): { circles: number[], crosses: number[]} {
    const circles = new Array<number>();
    const crosses = new Array<number>();
    for(let i = 0; i < squares.length; i++) {
        if (squares[i] == '◯') {
            circles.push(i);
        } else if(squares[i] == '✕') {
            crosses.push(i);
        }
    }
    return { circles, crosses };
}
function check(targetIndices: readonly number[],
        nextTarget: CheckTarget): boolean {
    if (targetIndices.some(i => nextTarget.index == i)) {
        if (nextTarget.match.length <= 0) {
            return true;
        }
        if (nextTarget.match.some(t => check(targetIndices, t))) {
            return true;
        }
    } else {
        if (nextTarget.unmatch.length <= 0) {
            return false;
        }
        if (nextTarget.unmatch.some(t => check(targetIndices, t))) {
            return true;
        }
    }
    return false;
}
export function checkGameFinished(squares: readonly SquareValue[]): GameResult {
    console.log("check");
    const targets = getTargetIndices(squares);
    if (check(targets.circles, checkTargets)) {
        return { finished: true, winner: '◯' };
    } else if (check(targets.crosses, checkTargets)) {
        return { finished: true, winner: '✕' };
    }
    return { finished: false, winner: null };
}
ゲームの勝敗確認の処理はもう少し簡略化したい。。。
game-score.service.ts
import { Injectable } from '@angular/core';
import { SquareValue } from './board/square/square-value';
import { Observable, of } from 'rxjs';
import { GameResult } from './game-result';
import * as GameChecker from './check-game-finished';

@Injectable({
  providedIn: 'root'
})
export class GameScoreService {

  constructor() { }
  public checkResult(squares: readonly SquareValue[]): Observable<GameResult> {
    return of(GameChecker.checkGameFinished(squares));
  }
}
Effects を追加する
game-result.effects.ts
import { Injectable } from '@angular/core';
import { Actions, createEffect, ofType } from '@ngrx/effects';
import { map, mergeMap, catchError } from 'rxjs/operators';
import { GameScoreService } from './game-score.service';
import { checkScore, gameFinished } from './game.actions';
import { EMPTY } from 'rxjs';
@Injectable()
export class GameResultEffects {
    /* this would be fired by dispatching "checkScore" action. */
    checkResult$ = createEffect(() => this.actions$.pipe(
        ofType(checkScore),
        /* call service */
        mergeMap(action => this.gameScoreService.checkResult(action.squares)
            .pipe(
                /* make an action fired */
                map(result => gameFinished({ result })),
                catchError(error => {
                    console.error(error);
                    return EMPTY;
                })
            ))));
    constructor(
        private actions$: Actions,
        private gameScoreService: GameScoreService
      ) {}
}
game.action.ts
import { createAction, props } from '@ngrx/store';
import { SquareValue } from './board/square/square-value';
import { GameResult } from './game-result';

...
export const checkScore = createAction('[Score] checkScore',
    props<{ squares: readonly SquareValue[]}>());
export const gameFinished = createAction('[Game] finished',
    props<{ result: GameResult }>());
Effects を登録する
Reducer と同じように app.module.ts に Effects を追加します。
app.module.ts
import { BrowserModule } from '@angular/platform-browser';
import { NgModule } from '@angular/core';
import { AppComponent } from './app.component';
import { StoreModule } from '@ngrx/store';
import { BoardComponent } from './tic-tac-toe/board/board.component';
import { SquareComponent } from './tic-tac-toe/board/square/square.component';
import * as gameReducer from './tic-tac-toe/game.reducer';
import { EffectsModule } from '@ngrx/effects';
import { GameResultEffects } from './tic-tac-toe/game-result.effects';
@NgModule({
  declarations: [
    AppComponent,
    BoardComponent,
    SquareComponent
  ],
  imports: [
    BrowserModule,
    StoreModule.forRoot({game: gameReducer.reducer}),
    EffectsModule.forRoot([GameResultEffects])
  ],
  providers: [],
  bootstrap: [AppComponent]
})
export class AppModule { }
Component に接続する(失敗)
こちらも Reducer のときと同じように Component に状態受け取りと Action 発行の処理を追加します。
board.component.ts
import { Component, OnInit } from '@angular/core';
import { BoardState } from './board-state';
import { Store, select } from '@ngrx/store';
import { Observable } from 'rxjs';
import { updateSquare, checkScore } from '../game.actions';
import { GameResult } from '../game-result';
import { SquareValue } from './square/square-value';

@Component({
  selector: 'app-board',
  templateUrl: './board.component.html',
  styleUrls: ['./board.component.css']
})
export class BoardComponent implements OnInit {
  public state$: Observable<BoardState>;
  public result$: Observable<GameResult>;

  constructor(private store: Store<{game: BoardState, result: GameResult }>) {
    this.state$ = store.pipe(select('game'));
    this.state$.subscribe(s => this.onValueChanged(s.squares));
    this.result$ = store.select(state => state.result);
    this.result$.subscribe(r => console.log(r));
  }

  ngOnInit(): void {
  }
  public updateSquare(index: number) {
    this.store.dispatch(updateSquare({index}));
  }
  private onValueChanged(squares: readonly SquareValue[]) {
    this.store.dispatch(checkScore({squares}));
  }
}
課題と対策
「gameScoreService.checkResult」の処理実行などは問題ないにもかかわらず、「this.result$.subscribe(r => console.log(r));」が実行されません。
結局 Effects から発行されている「gameFinished」の Action をハンドリングする Reducer がいない、ということが原因でした。
Effects から Action を発行すると、良い感じに StoreModule が状態をさばいてくれる、とかいう都合の良い展開にはならない、ということですね。
ということで Reducer を追加します。
game-result.reducer.ts
import { GameResult } from './game-result';
import { createReducer, on, Action } from '@ngrx/store';
import { gameFinished } from './game.actions';

function initialState(): GameResult {
    return {
        finished: false,
        winner: null
    };
}
const _resultReducer = createReducer(initialState(),
    on(gameFinished, (state, {result}) => {
        if (result.finished) {
            return result;
        }
        return state;
    }));
export function reducer(state: GameResult | undefined, action: Action) {
    return _resultReducer(state, action);
}
app.module.ts
...
import * as gameResultReducer from './tic-tac-toe/game-result.reducer';
import { EffectsModule } from '@ngrx/effects';
import { GameResultEffects } from './tic-tac-toe/game-result.effects';
@NgModule({
...
  imports: [
    BrowserModule,
    StoreModule.forRoot({game: gameReducer.reducer, result: gameResultReducer.reducer}),
    EffectsModule.forRoot([GameResultEffects])
  ],
...
これで result$ の変化も受け取ることができました。
今回は何もしていませんが、 Service で例外が発生した場合 Effects から Action として発行することができるため、実運用ではこちらも Reducer で処理することになると思います。
次回に続く。。。はず
TypeORMに触れてみる 2
はじめに
今回はマイグレーションと外部キーの設定について。
Migration
まずマイグレーションから。 TypeORM のコマンドでファイルを作ります。
npx typeorm migration:create -n AddUpdateDate
生成されたファイルは src/migration に出力されます。
1591186678545-AddUpdateDate.ts
import {MigrationInterface, QueryRunner} from "typeorm";
export class AddUpdateDate1591186678545 implements MigrationInterface {
    public async up(queryRunner: QueryRunner): Promise<void> {
    }
    public async down(queryRunner: QueryRunner): Promise<void> {
    }
}
そのままだと何も実行されないので、処理を追加します。 今回は "updateDate" カラムを "SampleUser" に追加します。
1591186678545-AddUpdateDate.ts
import {MigrationInterface, QueryRunner} from "typeorm";
export class AddUpdateDate1591186678545 implements MigrationInterface {
    public async up(queryRunner: QueryRunner): Promise<void> {
      await queryRunner.query(`ALTER TABLE "SampleUser" ADD COLUMN "updateDate" date DEFAULT current_timestamp NOT NULL`);
    }
    public async down(queryRunner: QueryRunner): Promise<void> {
      await queryRunner.query(`ALTER TABLE "SampleUser" DROP COLUMN "updateDate"`);
    }
}
重要(多分)な点として、 SQL ではデータ型で何もしないと Nullable になる、ということです。
Entity クラスはデフォルトで Not Null なので、実行するとエラーになって??になる、という。
マイグレーション実行(失敗)
"migration:run" コマンドを実行すると処理が反映されるはず。
npx typeorm migration:run
しかし実際はエラーになります。
import {Entity, PrimaryGeneratedColumn, Column} from "typeorm";
^^^^^^

SyntaxError: Cannot use import statement outside a module
    at wrapSafe (internal/modules/cjs/loader.js:1101:16)
    at Module._compile (internal/modules/cjs/loader.js:1149:27)
    at Object.Module._extensions..js (internal/modules/cjs/loader.js:1205:10)
    at Module.load (internal/modules/cjs/loader.js:1034:32)
    at Function.Module._load (internal/modules/cjs/loader.js:923:14)
    at Module.require (internal/modules/cjs/loader.js:1074:19)
    at require (internal/modules/cjs/helpers.js:72:18)
    at Function.PlatformTools.load (C:\Users\example\Documents\workspace\gen-typeorm-sample\node_modules\typeorm\platform\PlatformTools.js:114:28)
    at C:\Users\example\Documents\workspace\gen-typeorm-sample\node_modules\typeorm\util\DirectoryExportedClassesLoader.js:39:69
    at Array.map (<anonymous>)
マイグレーションを実行する(成功)
これは、今回 "ts-node" を使用していることが原因のようです。
下記のように実行すれば OK です。
npx ts-node ./node_modules/typeorm/cli.js migration:run
また、処理を取り消したい場合は下記のようにすれば OK です。
npx ts-node ./node_modules/typeorm/cli.js migration:revert
"migration:revert" を実行すると、最後に実行した処理が取り戻されます。
"migration" テーブル
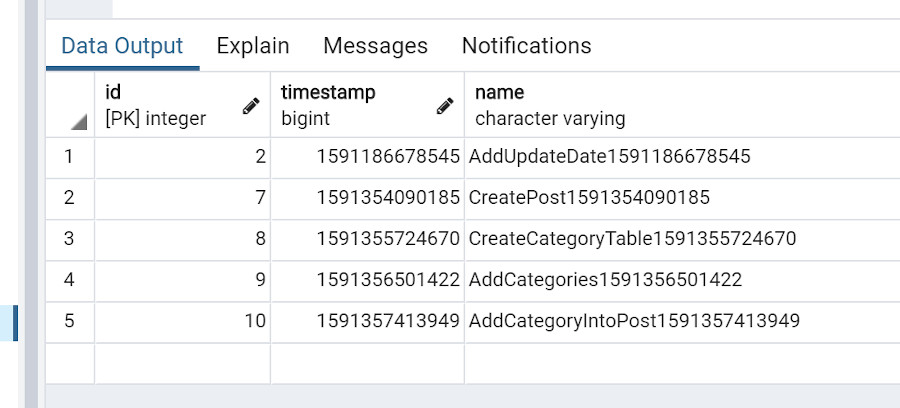
"migration:run" を最初に実行すると、"migration" というテーブルが追加されます。

反映された処理はこのテーブルに記録されているため、下記のような操作をすると、最後の処理が無視されます。
- マイグレーションファイルによってテーブルを作る。
- PgAdmin などを使って直接 1.のテーブルを削除する。
- "migration:run" で 1.を再実行する。
いつ新しい ID が発行されるか
たとえば2つのテーブル(テーブル A 、B とする)に一度に追加する場合。
B が A の ID を参照しているとします。
これを実現しようとすると、 A にデータを追加したあと、その ID を B に渡す必要があります。
では、A の ID はいつ発行されるでしょうか。
というのを試してみます。
index.ts
import "reflect-metadata";
import {createConnection } from "typeorm";
import { SampleUser } from "./entity/sample-user";

createConnection().then(async connection => {
   const queryRunner = connection.createQueryRunner();
   await queryRunner.startTransaction();
   try{
      const thirdUser = new SampleUser();
      thirdUser.firstName = 'Hello4';
      thirdUser.lastName = 'World4';
      thirdUser.age = 43;

      console.log("Before saving");
      console.log(thirdUser);

      await queryRunner.manager.save(thirdUser);

      console.log("Before committing");
      console.log(thirdUser);

      queryRunner.commitTransaction();

      console.log("After");
      console.log(thirdUser);
    }catch(error) {
        await queryRunner.rollbackTransaction();
    }
    finally {
        await queryRunner.release();
    }
}).catch(error => console.log(error));
結果
Before saving
SampleUser { id: -1, firstName: 'Hello4', lastName: 'World4', age: 43 }
Before committing
SampleUser { id: 6, firstName: 'Hello4', lastName: 'World4', age: 43 }
After
SampleUser { id: 6, firstName: 'Hello4', lastName: 'World4', age: 43 }
ということで、 "queryRunner.manager.save" 実行後に ID が取得できます。
外部キー
"SampleUser" の "id" を外部キーとして設定するにはどうすれば良いでしょうか。
@ManyToOne(), @OneToMany(), @OneToOne(), @JoinColumn() を使って実現できます。
sample-user.ts
import {Entity, PrimaryGeneratedColumn, Column, OneToMany, UpdateDateColumn} from "typeorm";
import { Post } from "./post";

@Entity("SampleUser")
export class SampleUser {
    @PrimaryGeneratedColumn()
    id: number = -1;

    @Column({ type: 'text' })
    firstName: string = '';

    @Column({ type: 'text' })
    lastName: string = '';

    @Column()
    age: number = -1;

    @UpdateDateColumn({ type: 'timestamptz' })
    updateDate: Date = new Date();

    @OneToMany(type => Post, post => post.user)
    posts: Post[]|null = null;

}
post.ts
import {Entity, PrimaryGeneratedColumn, Column, ManyToOne, UpdateDateColumn, OneToOne, JoinColumn} from "typeorm";
import { SampleUser } from "./sample-user";
import { Category } from "./category";

@Entity("Post")
export class Post {
    @PrimaryGeneratedColumn()
    id: number = -1;

    @ManyToOne(type => SampleUser, user => user.posts)
    user: SampleUser = new SampleUser();

    @OneToOne(() => Category)
    @JoinColumn([{
        name: 'categoryId',
        referencedColumnName: 'id'
    }])
    category: Category = new Category();

    @Column({ type: 'text' })
    title: string = '';

    @Column({ type: 'text' })
    article: string = '';

    @UpdateDateColumn({ type: 'timestamptz' })
    updateDate: Date = new Date();
}
category.ts
import {Entity, PrimaryGeneratedColumn, Column, UpdateDateColumn} from "typeorm";

@Entity("Category")
export class Category {
    @PrimaryGeneratedColumn()
    id: number = -1;

    @Column({ type: 'text' })
    name: string = '';

    @UpdateDateColumn({ type: 'timestamptz' })
    updateDate: Date = new Date();
}
テーブル生成を synchronize: true ですべきかマイグレーションファイルですべきか
これまで、 ormconfig.json で "synchronize" を true に設定して実行していました。
そのため、実行したときにテーブルが存在していなければ自動で生成されていました。
しかし、テーブルの追加はマイグレーションファイルに "CREATE TABLE" を書いても実現できます。
1591186678544-CreateSampleUserTable.ts
import {MigrationInterface, QueryRunner} from "typeorm";

export class AddCreateSampleUserTable1591186678544 implements MigrationInterface {
    public async up(queryRunner: QueryRunner): Promise<void> {
        await queryRunner.query(`CREATE TABLE "SampleUser" ( id serial PRIMARY KEY, "firstName" text NOT NULL, "lastName" text NOT NULL, "age" integer NOT NULL)`);
    }
    public async down(queryRunner: QueryRunner): Promise<void> {
        await queryRunner.query(`DROP TABLE "SampleUser"`);
    }
}
どちらを使うべきでしょうか。
という答えはまだ見つけられていないのですが、少なくともマスタテーブル(基本的に更新せず、他のテーブルから参照するためのデータを持つテーブル)については "synchronize" では解決できないので、マイグレーションファイルからテーブル生成も行おうかと思います。
1591356501422-AddCategories.ts
import {MigrationInterface, QueryRunner} from "typeorm";
import { Category } from "../entity/category";
export class AddCategories1591356501422 implements MigrationInterface {
    public async up(queryRunner: QueryRunner): Promise<void> {
        const programming = new Category();
        programming.name = 'Programming';
        await queryRunner.manager.save(programming);
        const book = new Category();
        book.name = 'Book';
        await queryRunner.manager.save(book);
    }
    public async down(queryRunner: QueryRunner): Promise<void> {
        await queryRunner.query(`DELETE FROM "Category"`);
    }
}
TypeORMに触れてみる 1
はじめに
久々すぎて書き方も忘れつつある今日このごろ。 プライベートでは TypeScript ばかり触れているわけなのですが、今回は TypeORM を試すことにしました。
あらかじめ DB(テーブル)を用意する方法もありますが、今回はコードから生成してみます。
- GitHub - typeorm/typeorm
- TypeORM - Amazing ORM for TypeScript and JavaScript (ES7, ES6, ES5). Supports MySQL, PostgreSQL, MariaDB, SQLite, MS SQL Server, Oracle, WebSQL databases. Works in NodeJS, Browser, Ionic, Cordova and Electron platforms.
インストールとプロジェクトの作成
インストール
もちろん TypeScript や TypeORM 、 PostgreSQL のドライバーは必要なのですが、それに加えて "reflect-metadata" が必要になります。
npm install --save typeorm reflect-metadata pg typescript tsc
npm install --save-dev @types/node
あと必須ではありませんが、 JavaScript に変換せずに TypeScript そのままで実行できるよう、"ts-node" も入れておきます。
npm install --save ts-node
準備
TypeORM のコマンドでプロジェクトを作ることもできます。
npx typeorm init --name gen-typeorm-sample --database postgres
今回はこれで生成されるファイルを参考に、順を追ってプロジェクトを作成してみます。
フォルダーとファイルの追加
とりあえず tsconfig.json を作っておきます。
npx tsc --init
lib やデコレーターの有効化などを行います。
tsconfig.json
{
  "compilerOptions": {
    /* Basic Options */
    "incremental": true,
    "target": "es5",
    "module": "commonjs",
    "lib": [
      "es5",
      "es6"
    ],
    "sourceMap": true,
    "outDir": "./build",
    /* Strict Type-Checking Options */
    "strict": true,
    "noImplicitAny": true,
    "strictNullChecks": true,
    "alwaysStrict": true,

    /* Additional Checks */
    "noUnusedLocals": true,

    /* Module Resolution Options */
    "moduleResolution": "node",
    "esModuleInterop": true,

    /* Experimental Options */
    "experimentalDecorators": true,
    "emitDecoratorMetadata": true,

    /* Advanced Options */
    "skipLibCheck": true,
    "forceConsistentCasingInFileNames": true
  }
}
で、 TypeORM で使用するファイルを格納するフォルダーを追加しておきます。
typeorm-sample(my project name)
L node_modules
L src
    L entity
    L migration
L package-lock.json
L package.json
L tsconfig.json
PostgreSQL の接続文字列などを設定する、 ormconfig.json を追加します。
ormconfig.json
{
    "type": "postgres",
    "host": "localhost",
    "port": 5432,
    "username": "test",
    "password": "test",
    "database": "test",
    "synchronize": true,
    "logging": true,
    "cache": false,
    "entities": [
       "src/entity/**/*.ts"
    ],
    "migrations": [
       "src/migration/**/*.ts"
    ],
    "subscribers": [
       "src/subscriber/**/*.ts"
    ],
    "cli": {
       "entitiesDir": "src/entity",
       "migrationsDir": "src/migration",
       "subscribersDir": "src/subscriber"
    }
 }
※テーブルはコードから生成できますが、データベースは先に作っておく必要があります。
というのを忘れて実行したせいでエラーになりました\(^o^)/
Entity クラスを追加する
sample-user.ts
import {Entity, PrimaryGeneratedColumn, Column} from "typeorm";

@Entity("SampleUser")
export class SampleUser {
    @PrimaryGeneratedColumn()
    id: number = -1;

    @Column()
    firstName: string = '';

    @Column()
    lastName: string = '';

    @Column()
    age: number = -1;
}
テーブル名はファイル名から決定されます。
そのため、今回のサンプルでそのまま実行するとテーブル名は "sample_user" となります。
@Entity() に "SampleUser" のように設定することで、テーブル名を指定できます。
余談ですが、 TypeORM のコマンドでプロジェクトを生成すると "user" というテーブルが作られることになるのですが、 "SELECT * FROM user" としてしまうと PostgreSQL のユーザー情報が出てきてしまうので、コマンドで作る場合もテーブルの名前は変えたほうが良いかもしれません。
テーブルを作成する
テーブルは最初にデータベースのテーブルにアクセスしたときに作成されます。
[2020-06-05 Update] テーブルが作成されるのはデータベースに接続したとき、でした。。。
index.ts
import "reflect-metadata";
import {createConnection} from "typeorm";
import { SampleUser } from "./entity/sample-user";

createConnection().then(async connection => {

    const user = new SampleUser();
    user.firstName = "Timber";
    user.lastName = "Saw";
    user.age = 25;
    // テーブルが生成される.
    await connection.manager.save(user);

    // 上のコードがない場合、ここで空のテーブルが生成される.
    const users = await connection.manager.find(User);
    console.log("Loaded users: ", users);

}).catch(error => console.log(error));

Primary key(自動採番)
"@PrimaryGeneratedColumn()" を指定すると、カラムの型は "serial" になり自動採番されます。
注意が必要なのは、この値(今回のサンプルでは "id" )は自分で値を変えることができない、ということです。
Create のときは "id" に入れた値が無視され、 Update のときは "id" の値を変えると別物として扱われます(新規登録される)。
NOT NULL
デフォルトでは "NOT NULL" としてカラムの型が設定されます。
Nullable にする必要がある場合は @Column() にオプションを追加します。
sample-user.ts
@Entity("SampleUser")
export class SampleUser {
...
    @Column({ nullable: true })
    age: number = -1;
}
@Column() で指定できるオプションはデフォルト値や型などいろいろな種類があります。 typeorm/entities.md at master · typeorm/typeorm · GitHub
また、 PostgreSQL で使用できる型の種類はこちらから。
typeorm/entities.md at master · typeorm/typeorm · GitHub
トランザクションを利用する
トランザクションを利用するのはどうすれば良いでしょうか。
調べてみるといくつか方法があるようですが、今回は QueryRunner を使うことにしました。
index.ts
import "reflect-metadata";
import {createConnection } from "typeorm";
import { SampleUser } from "./entity/sample-user";

createConnection().then(async connection => {
    const queryRunner = connection.createQueryRunner();
    await queryRunner.startTransaction();
    try{
        const secondUser = new SampleUser();
        secondUser.firstName = 'Hello2';
        secondUser.lastName = 'World2';
        secondUser.age = 36;
        await queryRunner.manager.save(secondUser);
        queryRunner.commitTransaction();
    }catch(error) {
        await queryRunner.rollbackTransaction();
    }
    finally {
        await queryRunner.release();
    }
}).catch(error => console.log(error));
注意点として、 "queryRunner.startTransaction()" や "queryRunner.rollbackTransaction()" は "connection.manager" には効かない、ということです。 上記の "queryRunner.manager.save(secondUser)" を "connection.manager.save(secondUser)" にしても動作はしますが、途中で例外が発生してもロールバックはされません。
続きます。
Babelを使ってみようとしたらハマった話とドラッグで要素を動かしてみたい話
はじめに
投稿が大変遅れましたが、この記事は JavaScript Advent Calendar 2019 の13日目の記事です。
要素をドラッグして動かしたい。
せっかくなので JavaScript で書いてみよう。
と思ったら Babel ハマったという話です。
Babel と Webpack を使う
TypeScript で書いていたときは、(Promise などを除いて) IE でも動くようトランスパイルしてくれていました。
じゃあ JavaScript では?というと、いくつか方法はあると思うのですが、今回は Babel を使ってみることにしました。
このときと同じく、 Webpack も使います。
インストール
インストール、セットアップは下記ドキュメント( Build system として Webpack を選択)に従えば OK でした。
Babel 、 Webpack に加え、ドラッグで要素を移動させるときに使用する RxJs も追加しておきます。
npm install --save webpack webpack-cli rxjs babel-loader @babel/core @babel/preset-env
設定ファイル
Babel ver.7 では .babelrc というファイルを設定ファイルとして使用するようです(ググってると babel.config.js とか出てきて混乱しました)。
.babelrc
{
    "presets": ["@babel/preset-env"],
}
サンプルコード(失敗)
MainPage.html
<!DOCTYPE html>
<html>
    <head>
        <meta charset="utf-8">
        <title>Hello</title>
    </head>
    <body>
        <button onclick="Page.doSomething()">Click</button>
    </body>
    <script src="../js/main.bundle.js"></script>
</html>
mainPage.js
import { AsyncSample } from "./asyncSample";

export async function doSomething() {
    const s = new AsyncSample();
    await s.doSomethingAsync();
}
asyncSample.js
export class AsyncSample {
    async doSomethingAsync() {
        return new Promise((resolve, reject) => {
            console.log('Hello World!');
            resolve();
        })
        .catch((reason) => reject(reason));
    }
}
webpack.config.js
var path = require('path');

module.exports = {
    mode: 'development',
    entry: {
        'main': './src/js/mainPage.js',
    },
    module: {
        rules: [
            {
                test: /\.js$/,
                exclude: /node_modules/,
                loader: "babel-loader"
            }
        ]
    },
    resolve: {
        extensions: [ '.js' ]
    },
    output: {
        filename: '[name].bundle.js',
        path: path.resolve(__dirname, './dist/js'),
        library: 'Page',
        libraryTarget: 'umd'
    }
};
そしてエラー
npx webpack -w とやるとコンパイルは成功します。
で、ボタンを押すとエラー発生と。
ReferenceError: regeneratorRuntime is not defined
regeneratorRuntime ってなんぞ?というと、async/await を Babel でトランスパイルするときに使われるもののようです。
なんとかする
で、これが足りないのでどうするか。
ぐぐると @babel/polyfill の話( ver.7.4? で Deprecated )が大量に出てきてこれまた混乱するのですが、今は regenerator-runtime と core-js を使うようです。
npm install --save regenerator-runtime core-js
どう使うのか、というと、 async/await や Promise を使うところで import します。
mainPage.js
import { AsyncSample } from "./asyncSample";
import "regenerator-runtime/runtime";

export async function doSomething() {
    const s = new AsyncSample();
    await s.doSomethingAsync();
}
asyncSample.js
import "core-js";
import "regenerator-runtime/runtime";

export class AsyncSample {
    async doSomethingAsync() {
        return new Promise((resolve, reject) => {
            console.log('Hello World!');
            resolve();
        })
        .catch((reason) => reject(reason));
    }
}
直接使っているわけでないものをインポートするのはしっくりこない気はしますが、別途 Polyfill を入れなくても Promise などに対応してくれるのはありがたいですね。
※ここより先は後ほど追記します(..)_
Angular で PWA に挑戦したい話
はじめに
※2019/12/06 一旦書き終わったところだけ公開いたします。
残りは仕事が終わったあと追記予定です(..)_
この記事は PWA Advent Calendar 2019 の 6 日目の記事です。
JSConf China 2019 で聴いて以来気になってはいた PWA(Progressive Web Application)。
Advent Calender に勢いで参加してみたは良いものの、思った以上に手が回らなかったので今回はとりあえず作って動かしてみる、ということで。
せっかくなので SheetJS を使って Excel 読み込み→表示をしてデスクトップアプリ感?を楽しんでみたいと思います。
インストール
とりあえず雑にプロジェクトを作りまして。。。
ng new pwa-xlsx-sample
ng add で PWA 用のパッケージを追加してもらう、と。
ng add @angular/pwa --project pwa-xlsx-sample
更に SheetJS を追加しておきます。
npm install xlsx --save
で ng s とかすればよいのかしら?と思ったらそうではなく、ビルドしてサーバー上で動かす( ng s ではなく)必要があるようです。
npm install http-server --save
ng build --prod
ようやく?準備ができたので、早速実行してみます。
npx http-server -p 8080 -c-1 dist/pwa-xlsx-sample
PC の Chrome などではどこからたどれば良いのかわからなかったのですが、 Android の Chrome からは Home に追加することも確認できました。
PWA 完全に理解した。
【TypeScript】type の使いどころが知りたい話
はじめに
※2020/04/12
お前の仕事はいつまで続くんだという話ですが、ようやく書き終わりました。。。
この記事は TypeScript Advent Calendar 2019 の 6 日目の記事です。
ふとコードを書いていて気になったのが、例えばサーバー側から受け取った値を JSON に変換したいとき、 class を使うべき? interface を使うべき? それとも type ?ということでした。
C# であれば class を選択することになります。
では TypeScript の場合は?
というか、 C# にも存在する class と interface はともかく、 type って何よ?どう使うの?となったので調べてみることにしました。
type について
まず type (正確には Type Aliases) とは何か、という話から。
alias (別名)の名前通り、型に対する別名をつけるためのものです。
使い方はこんな感じです。
type SampleType = string;
let sample: SampleType = "hello";

type SampleType2 = {
    id: number,
    name: string,
}
let sample2: SampleType2 = {
    id: 0,
    name: "world",
}
interface と type aliases
共通点
よく比較される interface と type aliases ですが、実際使い方によっては全く区別がつかない場合もあります。
interface SampleInterface {
    id: number;
    name: string;
}
let sample3: SampleInterface = {
    id: 1,
    name: "!!!",
}
どちらも JavaScript への変換後は消えてしまうためあくまで TypeScript 内での振る舞いに留まる点や、同じプロパティを持っていればその interface / type aliases として扱われる点など。
よく言われる(?)のが、(type aliases は継承ができないため)継承が必要なら interface を使う、という内容。
ver.3.8.3 現在、Classが実装する(implements)場合はどちらも可能です。
interface ISample{
    name: string;
}
type TSample = {
    message: string
};
/** OK */
class IClassSample implements ISample {
    public name: string = 'Hello'
}
/** OK */
class TClassSample implements TSample {
    public message: string = 'World'
}
interface / type aliases で違いはあるのか?その使い分けは?というのが気になったので調べてみることにしました。
(口調がいかがでしたかブログっぽいな)
違い
declaration merging
interface の大きな特徴(だと思う)は "declaration merging" です。
同じ namespace 、同じファイル、同じモジュール内に同名の interface がある場合、ひとまとまりの interface として扱われます。
interface ISample{
    name: string;
}
interface ISample{
    message: string;
}
function main() {
    // 1つ目、2つ目の ISample が統合される.
    const iSample: ISample = {
        name: 'Hello',
        message: 'World'
    };
}
同様のことは type alias で Cross 型を使って再現することはできますが、明示的に書く必要があります。
interface ISample{
    name: string;
}
type TSample = {
    message: string
};
type TCrossSample = ISample & TSample
function main() {
    const tSample: TCrossSample = {
        name: 'Hello',
        message: 'World'
    };
}
extends
これも interface のみの特徴ですが、 interface は interface や type aliases を拡張 (extends) できます。
interface ISample{
    name: string;
}
type TSample = {
    message: string
};
interface IExtendSample extends ISample, TSample {
    id: number;
}
function main() {
    const iSample: IExtendSample = {
        id: 0,
        name: 'Hello',
        message: 'World'
    };
}
これも同じく type alias で Cross 型を使って再現できます。
定義できる型
interface で定義できるのは下記のような形式のみです。
(propertyName はなくてもOK)
interface InterfaceName {
    propertyName: Type
};
type aliases はあくまで型に別名をつけるだけ、ということもあってか、色々な種類の型を定義できます。
interface ISample{
    name: string;
}
type TSample = {
    message: string
};
/** Union type */
type TUnionSample = ISample|TSample;
/** Cross type */
type TCrossSample = ISample & TSample & { id: number; }
/** Tuple */
type TTupleSample = [string, number];
/** Function */
type TFunctionSample = (message: string) => void;
/** Object */
type TObjectSample = {
    message: string
};
/** Mapped type */
type TBase = {
    id: number,
    name: string
};
type TMappedSample = { [P in keyof TBase]: string; };
/** Conditional type */
type TConditionalSample = T extends string? 'string': 'other';
function main() {
    const crossSample: TCrossSample = {
        id: 0,
        name: 'Hello',
        message: 'World'
    };
    const tupleSample: TTupleSample = ['hello', 0];
    const mappedSample: TMappedSample = {
        id: '0',
        name: 'Hello'
    };
    const conditionalSample: TConditionalSample = 'string';
}
Union 型、 Tuple は type aliases のみで定義できるため、 interface は使えません。
いつ type aliases を使うべきか?
interface と type aliases の違いはわかった気がしますが、 ではいつ type aliases を使うか。
(どちらも使用可能な場合)
Effective TypeScript によると、プロジェクトのスタイルに合わせる・または "declaration merging" が必要かどうかで判断するべき、と。
個人的には C# に慣れていることもあり、振る舞い(メソッド)を定義して Class で実装する場合は interface 、Data Transfer Object の用に、データを格納するためのオブジェクトは type aliases を使いたい気がします。