Xamarin.FormsでXAMLと仲良くしたい話 その1
はじめに
この記事は [初心者さん・学生さん大歓迎!] Xamarin その1 Advent Calendar 2017 の14日目の記事です。
とりあえず起動はするし、ボタンを押すとHello Worldと出力するとか、
簡単な動きくらいは作れる気がしてきました。
しかしながら、見た目がどうにもなのは悲しい。
ということで、今回は UI の部分について調べてみることにしました。
なお、 Xamarin.Forms ではボタンなどをコードで追加することもできますが、
今回は XAML を中心に進めてみます。
デフォルトで生成されるXAMLを見てみる
まず Blank App でプロジェクトを作成して、デフォルトの XAML を見てみます。
MainPage.xaml
< ?xml version="1.0" encoding="utf-8" ?>
< ContentPage xmlns="http://xamarin.com/schemas/2014/forms"
             xmlns:x="http://schemas.microsoft.com/winfx/2009/xaml"
             xmlns:local="clr-namespace:XamlSample"
             x:Class="XamlSample.MainPage">

    < Label Text="Welcome to Xamarin.Forms!"
           VerticalOptions="Center"
           HorizontalOptions="Center" />

< /ContentPage>
- 「xmlns:local="clr-namespace:XamlSample"」の行は、(少なくとも)デフォルトでは使用していないようで、
削除してしまっても特にエラーは起きませんでした。 - この記事を書く少し前のバージョンまで Label は ContentPage.Content と StackLayout の中に入れられていましたが、
仕様の変更があったようです。( PCL から .Net Standard に変更したことには関係がなさそうなので)
ContentPage に対して コードの表示 を行うと、 コードビハインド (MainPage.xaml.cs) が開きます。
要は XAML ファイルのルート要素とコードビハインドのクラスとが紐づいているので( x:Class="XamlSample.MainPage" で指定)、
コードから XAML 要素にアクセスすることが可能になるのですね。
Xamarin.Forms で使用できる Layout は下記の通り。
ボタンなどのコントロール類は、 WPF などと(多分)ほぼ同じです。
自動で各プラットフォームらしい見た目にしてくれるのはすごいですね!
xmlnsとxmlns:xについて
「xmlns="http://xamarin.com/schemas/2014/forms"」で XAML の使用を宣言しています。
「xmlns:x="http://schemas.microsoft.com/winfx/2009/xaml"」で「x:Class」や「x:Name」などのプロパティが使用可能になります。
x は変更可能で、「xmlns:x= ~ 」を「xmlns:xx= ~ 」のように変更すると「xx:Class」と書くことができるようになります。
また xmlns:x では Name など XML でも定義されているプロパティがありますが、
これはそのプロパティをどの要素に対しても使用可能にするために定義されているようです。
ContentPage直下のLayout
適当にいじっていた時におや?と思ったところですが、 ContentPage 直下におけるLayoutは一つだけのようです。
そのため、下記のように書いてしまうと、上に書いた StackLayout の内容が表示されませんでした。
< ?xml version="1.0" encoding="utf-8" ?>
< ContentPage xmlns="http://xamarin.com/schemas/2014/forms"
             xmlns:x="http://schemas.microsoft.com/winfx/2009/xaml"
             x:Class="XamlSample.View.MainPage">
    < StackLayout>
        < Label Text="Welcome to Xamarin.Forms!"
           VerticalOptions="Center"
           HorizontalOptions="Center" />
    < /StackLayout>
    < AbsoluteLayout>
            < BoxView WidthRequest="100" HeightRequest="100" BackgroundColor="YellowGreen"/>
    < /AbsoluteLayout>
< /ContentPage>
コードで要素を追加する
例えば Layout 内の要素は決まっていて、中のデータだけが変化する場合は DataBinding を使うのが良さそうです。
ただ、条件によって要素ごと差し替えたい場合だと難しそうです。
ということで、コードから要素を追加してみます。
追加対象の親要素を取得する
まずは要素を追加する対象となる、親の要素を取得してみます。
前述の通り、 XAML ファイルの要素とコードビハインドのクラスは紐付けられており、
コードビハインドで this.Content とすれば、 XAML ファイルの ContentPage.Content にアクセスできます。
ということで、あとは対象の要素を指定して、そこに子となる要素を追加するだけです。
MainPage.xaml
< ?xml version="1.0" encoding="utf-8" ?>
< ContentPage xmlns="http://xamarin.com/schemas/2014/forms"
             xmlns:x="http://schemas.microsoft.com/winfx/2009/xaml"
             x:Class="XamlSample.MainPage">
    < StackLayout x:Name="Outline">
        < Label Text="Welcome to Xamarin.Forms!"
            VerticalOptions="CenterAndExpand"
            HorizontalOptions="CenterAndExpand" />
    < /StackLayout>
< /ContentPage>
※2017.12.14 21:30更新
親要素を取得するのに FindByName を使用していましたが、
XAML で 親要素に x:Name で名前を付けている場合、
そのまま x:Name でつけた名前でコードビハインドでもアクセスできるそうです。
処理も減ってシンプルになりますね(*'▽')
田淵さん、ありがとうございますm(__)m
Before
// 親要素となる StackLayout.
var layout = this.FindByName< StackLayout>("Outline");
layout.Children.Add(addContent);
After
// 親要素となる StackLayout.
Outline.Children.Add(addContent);
MainPage.xaml.cs
using Xamarin.Forms;

namespace XamlSample
{
    public partial class MainPage : ContentPage
    {
        public MainPage()
        {
            InitializeComponent();

            // 追加する要素.
            var addContent = new Label
            {
                Text = "Label from code",
                VerticalOptions = LayoutOptions.CenterAndExpand,
                HorizontalOptions = LayoutOptions.CenterAndExpand,
            };
            // 親要素となる StackLayoutに要素を追加.
            Outline.Children.Add(addContent);
        }
    }
}
- これで「Welcome to Xamarin.Forms!」というラベルの下に、
「Label from code」というラベルが追加されます。
レイアウトしてみる StackLayout
それでは、いくつか Layout を試してみます。
StackLayout
- 縦方向または横方向に要素を並べます (Orientation で切り替え)。
- 何も指定しない場合、縦方向に並べる場合は横幅いっぱい、横方向の場合は縦幅いっぱいに要素が表示されます。
- StackLayout だけを使って縦横組み合わせたい場合は、 StackLayout を入れ子構造にします。
- ただし縦方向に並べる StackLayout と横方向に並べる StackLayout を同階層に置いてしまうとエラーになります。
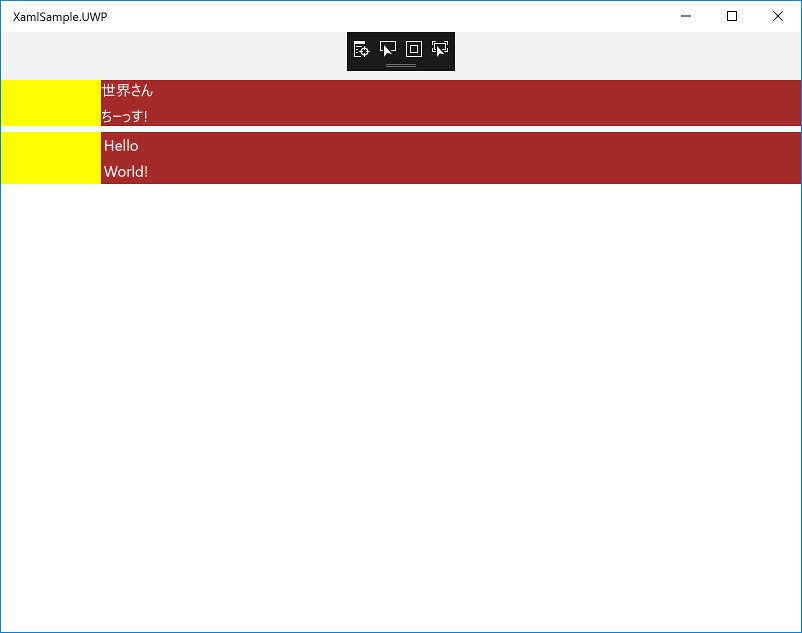
例
< ?xml version="1.0" encoding="utf-8" ?>
< ContentPage xmlns="http://xamarin.com/schemas/2014/forms"
             xmlns:x="http://schemas.microsoft.com/winfx/2009/xaml"
             x:Class="XamlSample.View.MainPage">
    < StackLayout BackgroundColor="Azure" Orientation="Vertical" VerticalOptions="Start">
        < StackLayout Orientation="Horizontal" Spacing="0">
            < BoxView BackgroundColor="Yellow" WidthRequest="100" />
            < StackLayout Orientation="Vertical" BackgroundColor="Brown" HorizontalOptions="FillAndExpand">
                < Label Text="世界さん" TextColor="White"/>
                < Label Text="ちーっす!" TextColor="White" />
            < /StackLayout>
        < /StackLayout>
        < StackLayout Orientation="Horizontal" Spacing="0">
            < BoxView BackgroundColor="Yellow" WidthRequest="100" />
            < StackLayout Orientation="Vertical" BackgroundColor="Brown" HorizontalOptions="FillAndExpand" Spacing="0">
                < Label Text="Hello" TextColor="White" Margin="3, 3, 3, 3"/>
                < Label Text="World!" TextColor="White" Margin="3" />
            < /StackLayout>
        < /StackLayout>
    < /StackLayout>
< /ContentPage>
- 要素同士はデフォルトでスペースが含まれるので、なくしたい場合は Spacing を "0" にする必要があります。
結果はこんな感じになります。

レイアウトしてみる GridView
次は格子状にレイアウトできる GridView を試してみます。
GridView では行数・列数とサイズを指定し、要素と配置する場所を指定します。
< ?xml version="1.0" encoding="utf-8" ?>
< ContentPage xmlns="http://xamarin.com/schemas/2014/forms"
             xmlns:x="http://schemas.microsoft.com/winfx/2009/xaml"
             x:Class="XamlSample.View.MainPage">
    < Grid VerticalOptions="FillAndExpand">

        < !-- 行の指定. 今回は一番下の行が30固定、残りが半分ずつ使うことになります -->
        < Grid.RowDefinitions >
            < RowDefinition Height="1*"/>
            < RowDefinition Height="Auto"/>
            < RowDefinition Height="30"/>
        < /Grid.RowDefinitions >
        < !-- 列の指定. Widthを指定していないので3分割 -->
        < Grid.ColumnDefinitions>
            < ColumnDefinition />
            < ColumnDefinition />
        < /Grid.ColumnDefinitions>
        < !-- StackLayoutを入れたり-->
        < StackLayout VerticalOptions="FillAndExpand"
                     HorizontalOptions="FillAndExpand"
                     BackgroundColor="Yellow">
            < Label Text="世界さんちーっす" />
        < /StackLayout>
        < !-- GridViewを入れたり-->
        < Grid VerticalOptions="FillAndExpand"
                  Grid.Row="0"
                  Grid.Column="1" >
            < Grid.RowDefinitions >
                < RowDefinition Height="Auto"/>
                < RowDefinition Height="Auto"/>
            < /Grid.RowDefinitions >
            < Grid.ColumnDefinitions>
                < ColumnDefinition />
                < ColumnDefinition />
            < /Grid.ColumnDefinitions>
            < BoxView Color="Aqua"
                     Grid.Row="0"
                     Grid.Column="0" />
            < BoxView Color="Maroon"
                     Grid.Row="1"
                     Grid.Column="0" />
            < BoxView Color="Navy"
                     Grid.Row="1"
                     Grid.Column="1" />
            < BoxView Color="Silver"
                     Grid.Row="0"
                     Grid.Column="1" />
        < /Grid>
        < BoxView Color="Maroon"
                 Grid.Row="1"
                 Grid.Column="0" />
        < BoxView Color="Navy"
                 Grid.Row="1"
                 Grid.Column="1" />
        < BoxView Color="Purple"
                 Grid.Row="2"
                 Grid.Column="0" />
        < BoxView Color="Lime"
                 Grid.Row="2"
                 Grid.Column="1" />
    < /Grid>
< /ContentPage>
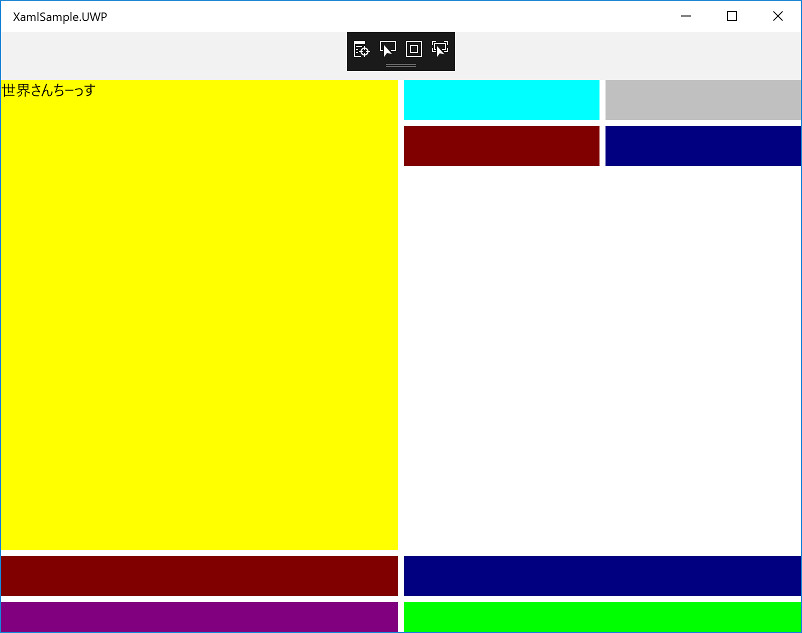
- Grid.Row 、Grid.Column を指定しない場合、デフォルトで Grid.Row: 0 、Grid.Column: 0 が設定されるため、
複数あると最初の要素が隠れてしまいます。
上記のコードを実行するとこのようになります。

複雑なレイアウトを行う場合は、行番号・列番号の指定がややこしそうですね。。。
BoxViewについて
これまでも登場している BoxView ですが、これは四角形を表示するものです。
GridView などと同じように、中に Label などの要素を入れられるのかな?と思いきやエラーになります。
エラーになる
< BoxView Color="Silver">
    < Label Text="世界さん、ちーっす" />
< /BoxView>
なのであくまでも四角形を表示するためのもの、ということのようです。
装飾などに利用するのでしょうか。
おわりに
とりあえず StackLayout と GridView 、 BoxView に触れてみましたが、
まだ「なんでこんな大きさになるの。。。(´・ω・`)」となることも多いです。
まぁこういうのは慣れが重要だと思いますので、実際にアプリを作りながら慣れていきたいと思います。
次回は入りきらなかった RelativeLayout の予定。。。のはず。
参照
Xamarin.Forms
- Xamarin.Forms Layouts - Xamarin
- Xamarin.Formsで画面レイアウトを作るためのレイアウトコントロールの必要最低限 - かずきのBlog@hatena
- Xamarin.Forms レイアウト(Formsを使用したアプリ作成の次の1歩) - Developers.IO
- Xamarin Forms Reusable Custom Content Views - Intellectual Ponderings
- Xamarinプログラミング入門