Xamarin.FormsでXAMLと仲良くしたい話 その2
はじめに
この記事は [初心者さん・学生さん大歓迎!] Xamarin その1 Advent Calendar 2017 の15日目の記事です。
そろそろ終盤にさしかかってきました。
最初は無理かな~とも思っていましたが、ここまではちゃんと続いていてすごいです!
ここまできたら、できれば最後まで完走したいですねぇ。
さて今回は、前回の続きとして RelativeLayoutに触れてみたいと思います。
サンプルを見てみる
RelativeLayout は、 Android の ConstraintLayout や iOS の AutoLayout のように、
要素の表示位置やサイズに制約を付けてレイアウトを組むものです。
といっても分かりづらいので、公式のサンプルを見てみます。
https://developer.xamarin.com/guides/xamarin-forms/user-interface/layouts/relative-layout/
< RelativeLayout>
    < BoxView Color="Red" x:Name="redBox"
        RelativeLayout.YConstraint="{ConstraintExpression Type=RelativeToParent,
            Property=Height,Factor=.15,Constant=0}"
        RelativeLayout.WidthConstraint="{ConstraintExpression
            Type=RelativeToParent,Property=Width,Factor=1,Constant=0}"
        RelativeLayout.HeightConstraint="{ConstraintExpression
            Type=RelativeToParent,Property=Height,Factor=.8,Constant=0}" />
    < BoxView Color="Blue"
        RelativeLayout.YConstraint="{ConstraintExpression Type=RelativeToView,
            ElementName=redBox,Property=Y,Factor=1,Constant=20}"
        RelativeLayout.XConstraint="{ConstraintExpression Type=RelativeToView,
            ElementName=redBox,Property=X,Factor=1,Constant=20}"
        RelativeLayout.WidthConstraint="{ConstraintExpression
            Type=RelativeToParent,Property=Width,Factor=.5,Constant=0}"
        RelativeLayout.HeightConstraint="{ConstraintExpression
            Type=RelativeToParent,Property=Height,Factor=.5,Constant=0}" />
< /RelativeLayout>
ぎょえ~って感じがしますが、一つ一つ見てみましょう。
各 BoxView には大きく分けて4つの制約が付与されています。
- XConstraint : X 軸方向の表示位置の制約
- YConstraint : Y 軸方向の表示位置の制約
- WidthConstraint : 幅の制約
- HeightConstraint : 高さの制約
なおこれらの制約は順番を変えても問題ないようです。
また全ての制約を付与する必要はなく、いくつかだけを指定することも可能です。
(一つも指定しない場合は左上にデフォルトのサイズ(たぶん)で表示されました)
で、それぞれの制約の中を見てみると、同じような項目が設定されています。
- ConstraintExpression
- Type
- ElementName (下のBoxViewのみ)
- Property
- Factor
- Constant
ConstraintExpression は制約を付与する式を定義するよ~、というためのものだと思いますので、
それ以外の項目について見てみます。
Type
その要素の位置やサイズを、何をベースに決めるかを指定します。
指定できるのは下記の2種類です。
- RelativeToParent : 親要素をベースにする
- RelativeToView : 特定の要素をベースにする(要素の指定は ElementName で行う)
XConstraint、 YConstraint、 WidthConstraint、 HeightConstraint の四つをどちらかに統一する必要はなく、
それぞれ指定することができます。
ElementName
ちょっと順番をとばして ElementName です。
Type で書いた通り、Type を RelativeToView にしている場合に、ベースとなる要素を指定します。
ElementName が無い場合
その制約を指定しない場合と同じ状態で表示されます。
Type を RelativeToParent にして ElementName を指定した場合
特に変化はなさそうです。
存在しない要素名を ElementName に指定した場合
実行時に unhandled exception が発生します。
循環参照
2つの要素の Type を RelativeToView にして、ElementName にお互いの名前を指定した場合、
実行時に unhandled exception が発生します。
自分の名前を ElementName に指定した場合
実行時に unhandled exception が発生します。
ElementName の間違いによるエラーは、特に複雑なレイアウトの場合はやらかしがちだと思うので、
注意が必要ですね。。。
Property
制約のベースとなる親要素のプロパティを指定します。
例えば上の BoxView (RedBox) の子となる下の BoxView (BlueBox) を、
RedBox の右下に配置したい場合、下記のように書くことができます。
< RelativeLayout x:Name="Outline">
    < BoxView Color="Red" x:Name="RedBox"
        RelativeLayout.WidthConstraint="{ConstraintExpression
        Type=RelativeToParent,Property=Width,Factor=0.5,Constant=0}"
        RelativeLayout.HeightConstraint="{ConstraintExpression
        Type=RelativeToParent,Property=Height,Factor=0.5,Constant=0}" />

    < !-- X座標値をRedBoxのWidthに、Y座標値をRedBoxのHeightにする -->
    < BoxView Color="Blue" x:Name="BlueBox"
        RelativeLayout.YConstraint="{ConstraintExpression Type=RelativeToView,
        ElementName=RedBox, Property=Height, Factor=1,Constant=0}"
        RelativeLayout.XConstraint="{ConstraintExpression Type=RelativeToView,
        ElementName=RedBox, Property=Width, Factor=1,Constant=0}" />
< /RelativeLayout>
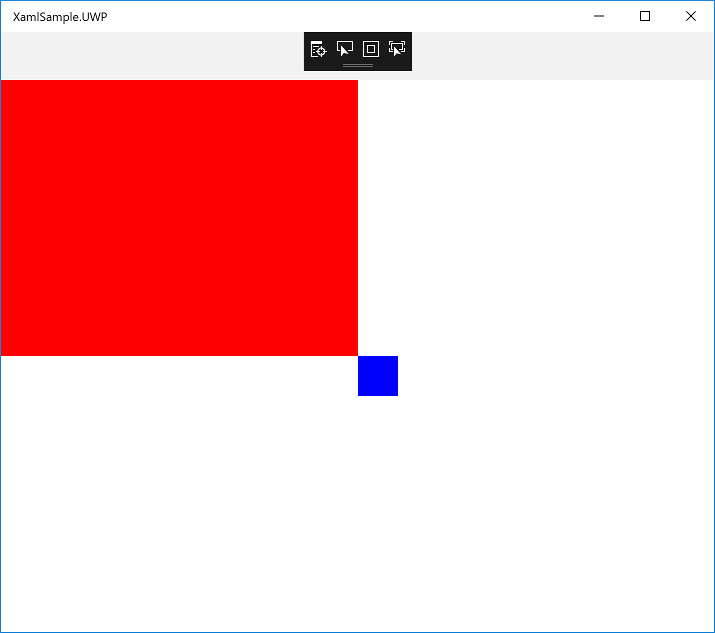
結果は以下の通りです。

Factor
Property で指定した親要素の値 * Factor + Constant の値が、子要素の値として設定されます。
例えば XConstraint で、Type=RelativeToParent、 Property=Width、 Factor=0.5 とした場合、
親要素の Width の 0.5 倍の値が X 座標値として設定されます。
マイナス、1より大きい数を指定することもできます。
ただし、当然ながら親要素が0の場合は変わりません。
Constant
オフセット値です。
マイナスの値を指定することもできます。
Width、 Height では、 0より大きい値を指定すると要素は大きくなり、
0未満の値を入れると小さくなります。
レイアウトしてみる
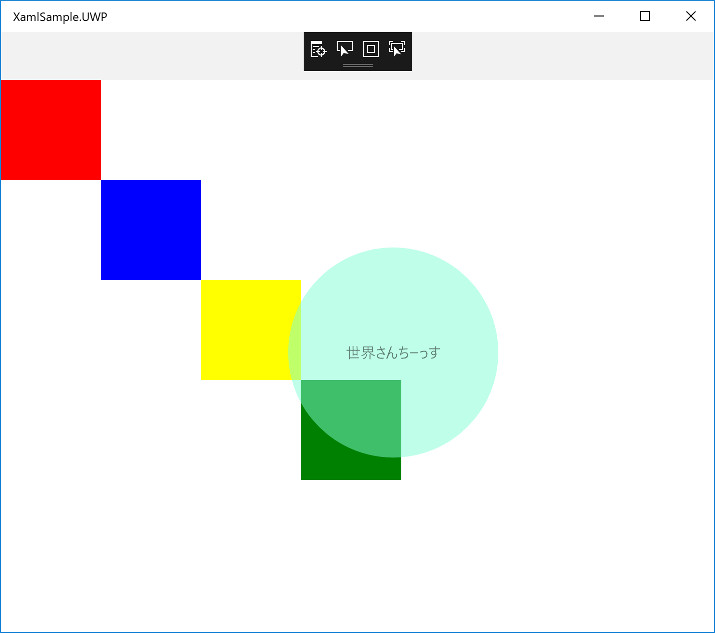
なんとなく並べてみました。
< ?xml version="1.0" encoding="utf-8" ?>
< ContentPage xmlns="http://xamarin.com/schemas/2014/forms"
             xmlns:x="http://schemas.microsoft.com/winfx/2009/xaml"
             x:Class="XamlSample.View.MainPage">
    < RelativeLayout x:Name="Outline">
        < !--これをベースに他の要素を配置 -->
        < BoxView Color="Red" x:Name="RedBox"
                 RelativeLayout.WidthConstraint="{ConstraintExpression
            Type=RelativeToParent,Property=Width,Factor=0,Constant=100}"
                 RelativeLayout.HeightConstraint="{ConstraintExpression
            Type=RelativeToParent,Property=Height,Factor=0,Constant=100}" />

        < BoxView Color="Blue" x:Name="BlueBox"
                 RelativeLayout.WidthConstraint="{ConstraintExpression
            Type=RelativeToView,Property=Width,Factor=1,ElementName=RedBox}"
                 RelativeLayout.YConstraint="{ConstraintExpression Type=RelativeToView,
            ElementName=RedBox,Property=Height,Factor=1}"
                 RelativeLayout.XConstraint="{ConstraintExpression Type=RelativeToView,
            ElementName=RedBox,Property=Width,Factor=1}"
                 RelativeLayout.HeightConstraint="{ConstraintExpression Type=RelativeToView,
            ElementName=RedBox,Property=Height,Factor=1}" />

        < BoxView Color="Yellow" x:Name="YellowBox"
                 RelativeLayout.WidthConstraint="{ConstraintExpression Type=RelativeToView,
            ElementName=RedBox, Property=Width,Factor=1}"
                 RelativeLayout.HeightConstraint="{ConstraintExpression Type=RelativeToView,
            ElementName=RedBox,Property=Height,Factor=1}"
                 RelativeLayout.YConstraint="{ConstraintExpression Type=RelativeToView,
            ElementName=RedBox,Property=Height,Factor=2}"
                 RelativeLayout.XConstraint="{ConstraintExpression Type=RelativeToView,
            ElementName=RedBox,Property=Width,Factor=2}" />

        < BoxView Color="Green" x:Name="GreenBox"
                 RelativeLayout.WidthConstraint="{ConstraintExpression Type=RelativeToView,
            ElementName=RedBox, Property=Width,Factor=1}"
                 RelativeLayout.HeightConstraint="{ConstraintExpression Type=RelativeToView,
            ElementName=RedBox,Property=Height,Factor=1}"
                 RelativeLayout.YConstraint="{ConstraintExpression Type=RelativeToView,
            ElementName=RedBox,Property=Height,Factor=3}"
                 RelativeLayout.XConstraint="{ConstraintExpression Type=RelativeToView,
            ElementName=RedBox,Property=Width,Factor=3}" />

        < Button BackgroundColor="Aquamarine" BorderRadius="180" Opacity="0.5"
                Text="世界さんちーっす"
                RelativeLayout.WidthConstraint="{ConstraintExpression Type=RelativeToParent,
            Property=Width, Factor=0.3}"
                RelativeLayout.HeightConstraint="{ConstraintExpression Type=RelativeToParent,
            Property=Width, Factor=0.3}"
                RelativeLayout.XConstraint="{ConstraintExpression Type=RelativeToParent,
            Property=Width,Factor=0.4, Constant=0}"
                RelativeLayout.YConstraint="{ConstraintExpression Type=RelativeToParent,
            Property=Height,Factor=0.3, Constant=0}"/>
    < /RelativeLayout>
< /ContentPage>
- ボタンでは BorderRadius で角を丸めることができ、180 にすると丸くすることができます。
ただし上記の状態だと、ハイライト時は四角く表示されてしまいます。 - Opacity を指定することで、透明度を設定することができます。
値は 0.0 ~ 1.0 です。 - ボタンの位置を画面中央にするのは、(画面サイズ / 2) - (ボタンサイズ / 2) の計算が必要なため、
XAMLではなく、コードビハインドで指定する必要があるようです。
(Constant に上記の書いたところ、エラーが発生しました)

おわりに
親要素のサイズ・位置を決めてそれをベースに他の要素をレイアウトする RelativeLayout は、
特に多様なディスプレイサイズへの対応が必要となるであろう Xamarin.Forms で大活躍してくれそうです。
とはいえデザインが固まる前から制約を正しく付与していくのはなかなか大変そうだったり(慣れの問題かもですが)、
内容によっては前回試していた StackLayout や GridView の方がシンプルに書けることもあると思うので、
上手く使い分けていきたいところです。
さて、アドベントカレンダー、明日は yakumomo さんです。
よろしくお願いいたします~m(__)m。